


- The IP address 192.168.1.1 is often used to access the router’s settings, allowing users to manage Wi-Fi names, passwords, and security settings.
- Users should change default router passwords and implement strong Wi-Fi security settings like WPA3 encryption to protect against attacks.
- Popular router brands, such as TP-Link and Asus, commonly use 192.168.1.1 as their access point, and users may need to revert to factory settings if default username and password configurations fail.
The IP addresses 192.168.1.1 and 192.168.0.1 are among the most commonly used default gateways for routers around the world. If you’ve ever tried logging into your router’s admin panel, chances are you’ve typed one of these into your browser. In this updated 2025 guide, we’ll walk you through everything you need to know about the 192.168.1.1 login page, the default username and password, how to change your WiFi name and password, how to enable stronger security, and what new steps are important for securing your home or office network in today’s environment.
Why Router Security Matters More in 2025?
Let’s face it — almost every location today has a wireless connection. From homes and offices to cafes, gyms, and airports, Wi-Fi is everywhere. While using free public Wi-Fi for casual browsing may seem harmless, the truth is that public networks are not secure. Even if the website is HTTPS encrypted, someone on the same network can still try to intercept your activity through various attack techniques.
That’s why securing your own home Wi-Fi network is more important than ever. If you haven’t changed your default router password or are still using a generic network name like TP-LINK_458B, your network is at risk. Even an amateur with minimal knowledge can gain access to poorly secured routers.
In this article, we’ll help you take control of your router’s settings using 192.168.1.1, and make sure your network is safe, private, and reliable in 2025.
Also Read: What is Akamai Net session Client? Uninstalling it? Safe or Not?
The IP address 192.168.1.1 is known as a private or internal IP address—commonly used by router manufacturers as the default gateway. When you enter it into your browser, it opens your router’s admin interface where you can make all configuration changes.
Most major brands—like TP-Link, D-Link, Netgear, Asus, Linksys, and others—use either 192.168.1.1 or 192.168.0.1 by default.
🔎 If you’re new to this: just think of 192.168.1.1 as the control panel for your entire Wi-Fi system.
Supported Router Brands & Default Gateway IPs
Not all routers use the same IP address. Here’s a quick list of popular brands and their default admin IPs:
| Brand | Default IP Addresses |
|---|---|
| TP-Link | 192.168.1.1 / 192.168.0.1 |
| D-Link | 192.168.0.1 / 192.168.1.254 |
| Netgear | 192.168.1.1 / routerlogin.net |
| Asus | 192.168.1.1 / 192.168.2.1 |
| Linksys | 192.168.1.1 / myrouter.local |
| Huawei | 192.168.100.1 / 192.168.1.1 |
| Tenda | 192.168.0.1 |
| Billion | 192.168.1.254 |
If you’re not sure which IP to use, simply:
- Look underneath your router or on its manual.
- Open Command Prompt (on Windows) and type: ipconfig, then look for “Default Gateway.”
| Name | Username | Password |
|---|---|---|
| TP-Link | admin | admin/password |
| D-link | admin | admin |
| Netgear | admin | admin |
| Asus | admin | password |
| Billion | admin | admin |
How to Login to Your WiFi Router 2025
- Make sure you’re connected to the router either wirelessly or via an Ethernet cable.
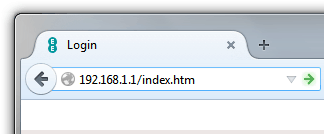
- In the address bar, type: https://192.168.1.1 or https://routerlogin.net (for Netgear)
- ✅ Always use HTTPS, as most routers now support encrypted admin panels to prevent browser warnings.
- Default login is often:
- Username: admin
- Password: admin or password
If these don’t work, check the label on your router or search “[Your Router Model] default login credentials” on Google.
Forgot the Password?
Press and hold the reset button (usually a pinhole at the back) for 10–15 seconds to restore default settings.
What You Can Do Once Logged In
After accessing your router admin panel, you can:
- Change your Wi-Fi name (SSID)
- Set a new Wi-Fi password
- Update admin credentials
- Enable stronger encryption (WPA3)
- Configure guest networks
- Manage parental controls
- Block unknown devices
- Check connected devices list
- Update firmware for security
How to Change Your Wi-Fi Name (SSID) and Password
- After logging into the admin panel, go to Wireless Settings.
- Change the SSID (Wi-Fi name) to something unique but not personally identifiable (avoid using your full name or house number).
- Set a strong password:
- At least 12–16 characters
- Use a mix of uppercase, lowercase, numbers, and special symbols.
- Avoid predictable strings like password123 or qwertyuiop.
- Hit Apply or Save. Your router may restart, and you will need to reconnect all devices using the new password.
⚠️ Your smart devices (TVs, speakers, Alexa, etc.) will need to reconnect using the new password too.
Also Read: Top 5 Best WiFi Analyzer for Windows 7/8/10
How to Secure Your Wi-Fi Router in 2025 (Must-Do Settings)

Router security is no longer optional in 2025. Hackers are using automated tools to scan vulnerable networks and exploit old routers that still use default passwords, outdated encryption, or WPS-enabled setups.
Use WPA3 Security (Not WPA2)
WPA3 is now the latest and most secure encryption protocol. Most modern routers released in the last 3–4 years support WPA3.
- Go to Wireless Settings or Security tab in the admin panel.
- Under Security Mode, choose WPA3-Personal.
- If your router doesn’t support WPA3, use WPA2-Personal AES (not TKIP).
- Save changes. Your router may restart.
🔐 WPA3 offers stronger protection against brute force attacks and provides individualized encryption for each device.
Turn Off WPS (Wi-Fi Protected Setup)
WPS allows users to connect without a password (using a PIN or physical button). It’s convenient—but also a security risk.
- Go to Advanced Wireless Settings.
- Look for WPS and disable it.
- Save and restart.
Create a Guest Network
If you frequently have guests at home or clients in your office, create a separate guest Wi-Fi.
- Navigate to Guest Network Settings.
- Enable Guest Wi-Fi.
- Choose WPA2 or WPA3 encryption.
- Set a simple password for guests.
- Prevent guest access to local devices (printers, storage, etc.).
This isolates guest users from your main network and keeps your devices safer.
Change Default Admin Username & Password
This is often the most ignored step, yet it’s the most important.
- Go to System Tools > Admin Settings.
- Change both the username and admin password.
- Use a strong password, e.g., X9@HomeNet_2025!
- Save and log in again with the new credentials.
Update Your Router’s Firmware
Firmware updates fix bugs, patch security holes, and improve performance.
- Go to System Tools > Firmware Upgrade or Software Update.
- If available, enable Automatic Updates.
- If manual: check your router brand’s official website, download the latest firmware for your model, and upload it in this section.
⚠️ Do not interrupt power while firmware is updating.
Disable Remote Management (Unless You Use VPN)
Remote access allows you to log in to your router from outside the network—but it can also be exploited.
- Go to Remote Management or Remote Access settings.
- Disable it unless you specifically use it with a VPN or secure port.
- Alternatively, enable it only on specific devices/IPs if your router allows.
Change the Default IP Address (Optional)
Changing the internal IP (e.g., from 192.168.1.1 to 192.168.48.1) can confuse basic attackers scanning your network.
- Navigate to Network > LAN Settings.
- Change the IP address (e.g., to 192.168.48.1).
- Save and reconnect using the new IP to access the admin panel.
⚠️ Not required for most users. Only do this if you understand local IP networking.
Also Read: How To See Private Instagram Profile & Photos Easily
How To TP-LINK ROUTER, LOGIN & IP
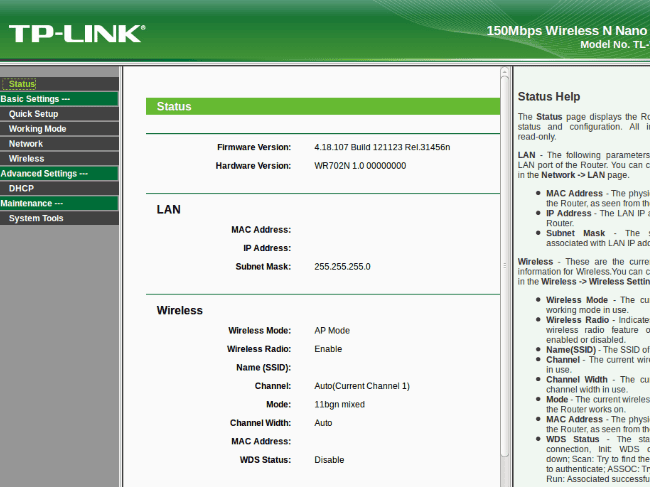
Step 1: First, you need to connect the TP-LINK Router, which has an IP address of 192.168.1.1. Connect the Router and PC with the RJ45 cable.
Step 2: Type 192.168.1.1 in any of the web browsers> Enter.
Step 3: Enter the username and password.
IP address: 192.168.1.1 (or https://tplinkwifi.net)
Username: admin
Password: admin/password
Step 4: Go to Wireless Settings and change your settings.
If you are facing issues while connecting the Router and accessing the 192.168.1.1 admin page, then you may have done something wrong. These are some possible mistakes.
Set the 192.168.1.1 Login page and Password (Video)
Final Words
That wraps up this detailed 2025 guide to 192.168.1.1 login, router username/password, and securing your Wi-Fi network. Whether you’re a first-timer or someone doing a routine upgrade, taking these steps seriously can drastically improve your online safety.
In today’s hyper-connected world, your router is the first line of defense. Keep it secure, keep it updated, and avoid taking shortcuts. Share this article with your friends, neighbors, or coworkers, because weak Wi-Fi security is a problem that spreads beyond just one household.
ALSO READ: 192.168.1.25 Admin Login Page, Username, Password, and WiFi Settings