


- iOS Setup Assistant is a guide that helps in setting up new or erased devices, configure settings, and customize preferences on iPhones or iPads.
- To go back to the iPhone setup screen, one must reset the iPhone by accessing Settings, tapping on General, choosing Reset, and selecting Erase All Content and Settings.
- It is important to backup data using iCloud before resetting the phone to avoid data loss, as there is no other way to access the iOS setup assistant screen.
Sometimes when setting up a new iPhone or iPad, we rush through the process or select the wrong settings without realizing it. Later, we regret those choices—whether it’s language, region, Apple ID, or Wi-Fi setup. And the first question that comes to mind is: “Can I go back to the iPhone setup screen?”
If you’ve ever wished to return to the iOS Setup Assistant screen, you’re not alone. Many users face the same issue, especially in 2025, as iOS becomes more feature-rich and configuration-heavy. Thankfully, although there’s no one-click “back to setup” option, there are a few effective methods you can use—provided you’re willing to reset your device.
In this guide, we’ll walk you through the most up-to-date methods in 2025 to return to the Setup Assistant screen, how to back up your iPhone before wiping it, and what settings you’ll go through once you’re back at the setup screen.
What is iOS Setup Assistant?
The iOS Setup Assistant is the built-in system that walks you through configuring your iPhone or iPad after a factory reset or when powering it on for the first time. It helps you select your language, region, Wi-Fi connection, privacy settings, Apple ID, and more. Whether it’s setting up Face ID or enabling iCloud, this assistant ensures that everything is ready for daily use.
How to Use iOS Setup Assistant on a New iPhone (2025)
If you’re using a brand new iPhone (or one that’s been fully erased), here’s how the setup flow works in 2025 with iOS 17 or iOS 18:
-
Press and hold the Side button until you see the Apple logo.
-
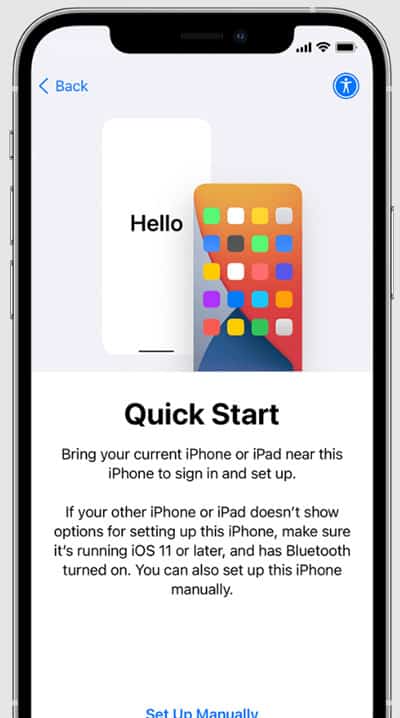
You’ll be greeted with a “Hello” screen. Swipe up to begin.
-
Choose a method
-
If you have an old iPhone nearby, use Quick Start. This will automatically transfer apps, settings, and data.
-
If you don’t have another device, choose Set Up Manually.
-
-
Internet is needed to activate your device and check Apple ID credentials.
-
You’ll now be prompted to set up Face ID or Touch ID, followed by a passcode.

-
Choose to:
-
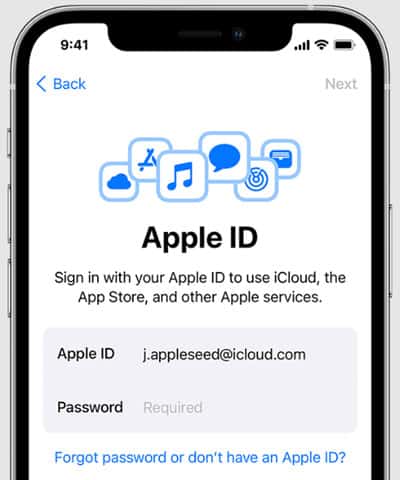
Enter your Apple ID and password. You’ll go through two-factor authentication if enabled.
-
Enable services like Siri, Screen Time, and Automatic Updates as needed.
-
Customize display options, accessibility, and other preferences.
How to Go Back to iPhone Setup Assistant in 2025
If you’ve already completed the setup but need to go back—maybe to change Apple ID or region—you’ll need to erase the device and start fresh. Unfortunately, there is no shortcut to launch Setup Assistant without wiping the iPhone.
Here’s how to do it properly using updated steps in iOS 17/18:
- Go to your Home screen and open the Settings app.

-
Turn off Find My iPhone (Important)
-
Erase all content
- Follow the on-screen instructions to confirm. Your iPhone will restart and begin wiping data.
- Once erased, the iPhone restarts and shows the Hello screen. From here, you’ll be guided by the iOS Setup Assistant again.
⚠️ Warning: This will delete all your apps, photos, messages, and saved content. Make sure you backup your data first before continuing.
How to Back Up Your iPhone Before Resetting
Before resetting your device to re-access the iOS Setup Assistant, it’s crucial to back up your data properly. This ensures you don’t lose important content like photos, messages, contacts, or app data.
You have multiple methods to back up your iPhone in 2025, but the most user-friendly and reliable options are still iCloud and Finder (Mac). Let’s walk through each:
Backing Up via iCloud (Recommended for Beginners)
This is the easiest way to back up if you have Wi-Fi and enough iCloud storage.
Steps to Back Up to iCloud:
- Open
Settings > Wi-Fiand connect to a stable network. - Tap
Settings > [Your Name] > iCloud. - Tap iCloud Backup and toggle Back Up This iPhone to ON.
- Tap Back Up Now and stay connected to Wi-Fi until the process completes.
Backup via Finder (Mac) or Apple Devices App (Windows)
If you don’t use iCloud or want a full encrypted backup, backing up via computer is a better choice.
On macOS (Catalina or later):
- Connect your iPhone via Lightning cable.
- Open Finder.
- Select your device from the sidebar.
- Click Back Up Now (select Encrypt local backup for passwords and health data).
- Wait until the backup is complete before disconnecting.
On Windows:
- Download Apple Devices app from the Microsoft Store.
- Connect your iPhone.
- Click on your device and choose Back Up Now.
🔒 Encrypted backups are highly recommended if you plan to restore everything (including saved passwords and app data) later.
Alternative Backup Tools for 2025
If you prefer third-party tools for more flexibility or scheduled backups, here are some trusted options:
- iMazing – Great for managing specific content like photos, SMS, WhatsApp data, etc.
- AnyTrans – Allows selective backup/restore and easier migration.
- Google One – Back up contacts, calendar, and photos (limited compared to iCloud).
These tools offer more control than iCloud or Finder, but for most users, iCloud is still the easiest and safest.
What Happens After You Reset?
Once your iPhone is erased and restarted, the iOS Setup Assistant will automatically appear. Here’s what you’ll be prompted to do again:
- Select language and region
- Connect to Wi-Fi or cellular
- Activate your device
- Set up biometric authentication (Face ID or Touch ID)
- Restore from backup (iCloud, Mac/PC, or direct transfer)
- Sign in with your Apple ID
- Configure system settings like Siri, Screen Time, updates, and display preferences
If you backed up properly, this process will feel like picking up right where you left off.
From Author’s Desk
In 2025, Apple still doesn’t offer a “go back” button for the Setup Assistant. The only guaranteed way to re-enter the setup screen is by erasing all content and starting fresh. While that may sound inconvenient, doing a proper backup beforehand ensures a smooth, risk-free experience.
We hope this updated guide has helped you confidently return to the iPhone setup screen with the most current steps for iOS 17 and iOS 18. Always double-check your settings before completing the initial setup, and remember—backing up is non-negotiable.
RELATED ARTICLES: